Beef Wellington Recipe: A Home Cook’s Triumph
The Beef Wellington Recipe That Almost Wasn’t (But I’m So Glad It Was) – There’s something about Beef Wellington that has always intimidated me.

Beef Wellington
Ingredients
- 400g mushrooms
- 1-2tbsp English Mustard
- Dash Olive Oil
- 750g piece Beef Fillet
- 6-8 slices Parma ham
- 500g Puff Pastry
- Dusting Flour
- 2 Beaten Egg Yolks
Instructions
- Put the mushrooms into a food processor with some seasoning and pulse to a rough paste. Scrape the paste into a pan and cook over a high heat for about 10 mins, tossing frequently, to cook out the moisture from the mushrooms. Spread out on a plate to cool.
- Heat in a frying pan and add a little olive oil. Season the beef and sear in the hot pan for 30 secs only on each side. (You don't want to cook it at this stage, just colour it). Remove the beef from the pan and leave to cool, then brush all over with the mustard.
- Lay a sheet of cling film on a work surface and arrange the Parma ham slices on it, in slightly overlapping rows. With a palette knife, spread the mushroom paste over the ham, then place the seared beef fillet in the middle. Keeping a tight hold of the cling film from the edge, neatly roll the Parma ham and mushrooms around the beef to form a tight barrel shape. Twist the ends of the cling film to secure. Chill for 15-20 mins to allow the beef to set and keep its shape.
- Roll out the puff pastry on a floured surface to a large rectangle, the thickness of a £1 coin. Remove the cling film from the beef, then lay in the centre. Brush the surrounding pastry with egg yolk. Fold the ends over, then wrap the pastry around the beef, cutting off any excess. Turn over, so the seam is underneath, and place on a baking sheet. Brush over all the pastry with egg and chill for about 15 mins to let the pastry rest.
- Heat the oven to 200C, 400F, gas 6.
- Lightly score the pastry at 1cm intervals and glaze again with beaten egg yolk. Bake for 20 minutes, then lower the oven setting to 180C, 350F, gas 4 and cook for another 15 mins. Allow to rest for 10-15 mins before slicing and serving with the side dishes of your choice. The beef should still be pink in the centre when you serve it.
Nutrition

Perhaps it’s the multiple steps, the precision needed, or those anxiety-inducing MasterChef episodes where contestants fall apart at the mere mention of this dish.
For years, I filed it under “restaurant food” – things I’m happy to pay professionals to make while I happily consume mac and cheese in my kitchen wearing sweatpants.
But last week, after my husband casually mentioned that Beef Wellington was his dream birthday dinner (after seven years of marriage, he drops this information NOW?), I found myself facing down a beautiful beef fillet at the butcher counter, wondering if I was about to waste $40 worth of meat and what remained of my culinary confidence.
A Brief History of Beef Magnificence
Before we dive into my kitchen adventure, let’s acknowledge what makes a Beef Wellington recipe so special.
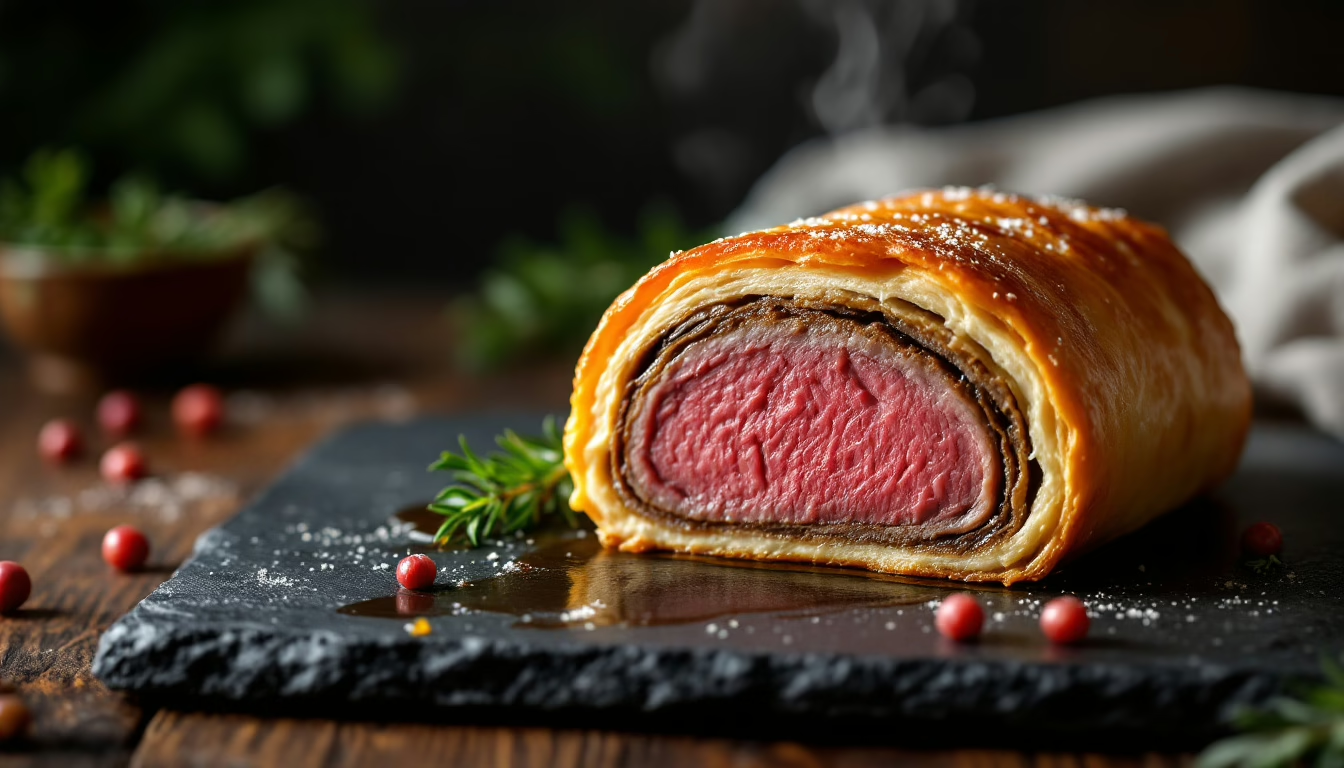
This classic British dish – a perfectly tender fillet of beef, coated in mustard and a mushroom duxelles, wrapped in Parma ham and then encased in golden puff pastry – is named either after the Duke of Wellington (of Napoleonic Wars fame) or the town in New Zealand.
Food historians can’t seem to agree, which makes me feel better about my own confusion when making it.
What everyone does agree on is that a proper Beef Wellington should have a crisp exterior, a perfectly medium-rare center, and no soggy bottom (my personal kitchen nemesis).
It’s the kind of dish that makes people think you’re fancy, even if you were panic-texting your foodie friend throughout the entire cooking process (not that I did that… twice).
The Ingredients That Make It Worth It
Here’s what you’ll need for your own Beef Wellington adventure:
- 400g mushrooms (I used cremini, but any variety works)
- 1-2 tablespoons English mustard (the punch it adds is non-negotiable)
- A glug of olive oil (that’s a technical measurement, trust me)
- 750g beef fillet (center cut, as evenly shaped as possible)
- 6-8 slices Parma ham (think of it as your moisture barrier superhero)
- 500g puff pastry (store-bought is perfectly fine; we’re ambitious, not masochistic)
- Flour for dusting
- 2 beaten egg yolks (for that golden finish we’re all after)
Let’s Cook the Beef Wellington
Let the culinary mastery begin as we prepare to savor the splendor of Beef Wellington, a dish that promises to be a symphony of flavors and textures, a true gastronomic delight.
The Mushroom Situation
First things first – let’s tackle the mushroom component, which chefs call “duxelles” because the French have fancy names for everything, including mushroom paste.
Place your mushrooms in a food processor with a generous pinch of salt and pepper and pulse until you have something resembling a rough paste. Don’t go too far – we’re not making mushroom smoothies here.
Scrape this mixture into a hot pan and cook it over high heat for about 10 minutes. This step is CRUCIAL for your Beef Wellington recipe to succeed.
You’re driving out moisture that would otherwise make your pastry soggy, and nobody has ever described a perfect Wellington as “soggy.”
Stir frequently and watch as the mixture darkens and dries out. When it’s done, spread it on a plate to cool completely.
Beef: The Main Character
Now for our star player. Heat a frying pan until it’s smoking hot, add a splash of olive oil, and season your beef fillet generously.
This quick sear is just about developing flavor through browning, not cooking the meat – 30 seconds per side is all you need. When all sides are seared, remove it and let it cool.
Once cool, brush the entire fillet with English mustard. Don’t be shy here – the mustard adds a crucial layer of flavor without overwhelming the beef. I was skeptical about this step but now consider myself a mustard evangelist.
The Wrapping Process (Or: How I Learned to Love Plastic Wrap)
Lay out a sheet of plastic wrap on your counter and arrange the Parma ham slices on it in slightly overlapping rows, creating a rectangle large enough to envelop your beef.
Using a palette knife (or a regular knife if that’s what you have – this isn’t the cooking Olympics), spread the cooled mushroom mixture evenly over the ham.
Place your mustard-coated beef in the center and then, keeping a tight hold on the plastic wrap, roll everything into a neat barrel shape. Twist the ends of the plastic wrap like you’re making a giant savory candy and refrigerate for 15-20 minutes.
This chilling step helps the Wellington maintain its shape, which I learned the hard way when I tried to rush it the first time.
The Pastry Embrace
Preheat your oven to 400°F (200°C) and roll out your puff pastry on a floured surface to the thickness of a coin. Remove the plastic wrap from your beef barrel and place it in the center of the pastry.
Brush the surrounding pastry with beaten egg yolk, then fold the ends over and wrap the pastry around the beef like you’re tucking in a very expensive, meaty child. Cut away any excess, turn the whole thing over so the seam is on the bottom, and transfer to a baking sheet.
Brush the entire pastry with more egg yolk and refrigerate for another 15 minutes. I know, more waiting – but this resting time prevents pastry shrinkage during baking. (If only there were a similar technique for my jeans after holiday eating.)
The Baking Finale
Once rested, score the pastry lightly with a sharp knife in a diagonal pattern – this is both for decoration and to help steam escape. Apply one final egg wash for maximum glossiness.
Bake at 400°F for 20 minutes until the pastry begins to color, then lower the temperature to 350°F (180°C) and bake for another 15 minutes.
This two-temperature approach ensures the pastry cooks through without burning while allowing the beef to reach the perfect doneness.
After baking, the hardest part: let it rest for 10-15 minutes before cutting. I know it’s torturous to wait, but this resting time allows the juices to redistribute within the meat.
Cut too soon, and all that beautiful juice ends up on your cutting board instead of in your mouth.
Troubleshooting Your Beef Wellington Recipe
During my Beef Wellington journey, I encountered a few hiccups that you might too:
- Pastry threatening to tear: Work quickly when wrapping, and keep the pastry cool. If tears appear, patch with scraps and egg wash.
- Temperature anxiety: If you’re nervous about doneness, a thermometer is your friend. For medium-rare, you’re aiming for 125-130°F (52-54°C) after resting.
- Timing concerns: This isn’t a last-minute dish. The good news is you can prepare everything up to the final baking stage a day ahead, keeping it covered in the refrigerator.
Why This Beef Wellington Recipe Is Worth Your Time
I won’t lie – making Beef Wellington requires effort. There were moments during the process when I questioned my life choices and wondered if pizza delivery was still an option.
But when I sliced into that Wellington and revealed the perfect gradient of pastry to meat, when my husband’s eyes widened at the first bite, I knew it was worth it.
This isn’t an everyday meal, but that’s precisely what makes it special. In our world of instant everything, there’s something deeply satisfying about creating a dish that demands attention and rewards patience.
My Beef Wellington wasn’t perfect – one end was slightly more cooked than the other – but it was made with care, and somehow that made it taste even better.
So if you’ve been contemplating tackling a Beef Wellington recipe but hesitating due to fear of failure, consider this your gentle push. Even an imperfect Wellington is still pretty magnificent, and the pride you’ll feel serving it is a seasoning no store can sell.